When I started to use WordPress one of the main problems I had was how to move a WordPress site from my local computer to my web host. There are some posts out there on how to deploy a WordPress blog, but quite a few of them are a bit too complicated. As with most things this problem is easily solved once you know what you are doing. It hit me the other day when I did just this for f1almanac.com that since I have now done this dozens of times I think it is time to share it with whoever has the same problem. Hopefully I can save somebody some time and frustration. So here is a step by step guide on how to deploy WordPress from localhost to your production web host.
Basic setup
I assume you have WordPress installed on your local computer, including a MySQL database and all. There is a really good guide on how to do this on WordPress.org. Once installed I also assume you have played around with your theme and settings and gotten the WordPress site to look and work just the way you want it.
My second assumption is that you have an account at a web host that supports PHP and allows you to setup a MySQL database. If you don’t then you can easily find many good cheap options via my web hosting price comparison site WebHostNinja.com. Many web hosts have one-click installs of WordPress, but this is nothing you need right now.
My third assumption is that you have a domain or subdomain where you want to have your fantastic WordPress site installed on. In this post I use the target domain name f1almanac.com, since that is the latest WordPress site I have deployed. Of course you need to replace “f1almanac.com” with your own domain name in all examples below.
Move the files
The first thing to do is to copy all your WordPress files from your local computer to your webhost. In my case this is all the files under /projects/f1_wp/ that I move to the directory on my host that corresponds to the domain I have choosen. For now just move all the files, no need to change anything in any file.
Move the database
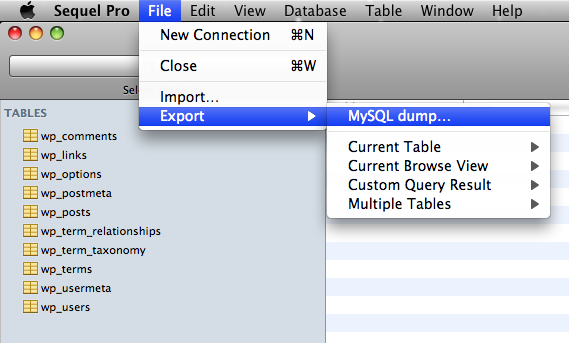
Next thing is to move the database structure and all it’s content from your localhost to your web host. First of just do a MySQL dump of the structure and content of your WordPress schema. This can be done in most MySQL GUI applications. Personally I use Sequal Pro and there the MySQL dump option is hiding under File->Export. Refer to the help files of your MySQL GUI app (or MySQL command line if you are hardcore) how to do a dump. The dump should result in a .sql file containing SQL statements to create all tables needed as well as inserting all the data needed into those tables.

Now we need to change some stuff in that .sql file. Open the file in a text editor and replace all local URLs to the URL of your new site. For me this means changing “http://localhost/f1_wp” to “http://www.f1almanac.com”. Without doing this your production WordPress installation would refer back to your localhost, and stuff would just not work. As always with search and replace, take it easy so that you dont break anything.

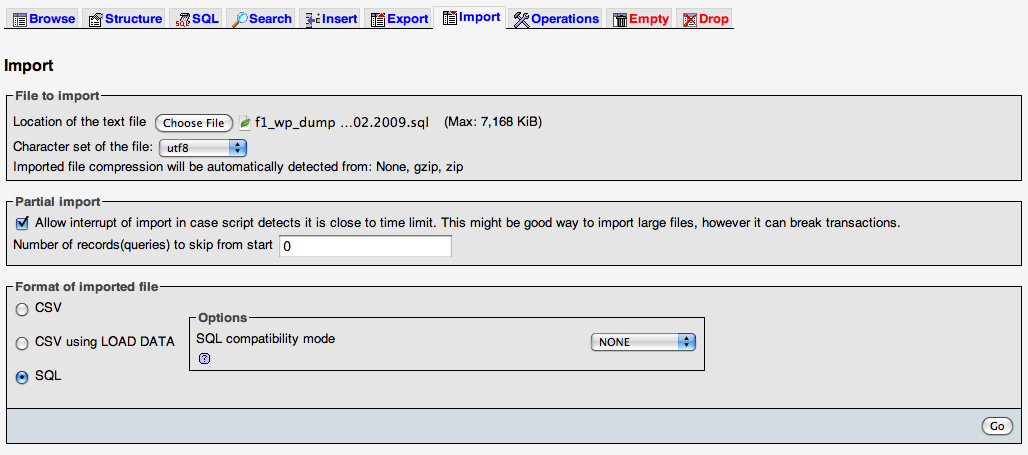
Create a new MySQL database on your web host, and open phpMyAdmin (or MySQL client of choice) for that database. In the “Import” tab of phpMyAdmin you can import an SQL file, so choose your newly edited .sql file and click “go” to import it. This creates all the tables needed and fills it with all the content you need, this includes pages, posts, plugin settings etc.

Change database configurations
At the moment the WordPress installation on your web host do not connect to the newly created and populated database, to do that just open wp-config.php on the host in a text editor (this is one of the files you uploaded to the host ealier). In the top of the file you find all the DB settings, so change DB_NAME, DB_USER etc to correspond to your new MySQL database and not your local database.
Once that is done you should have a fully working WordPress installation on f1almanac.com, or at least on your own domain 🙂
Final touches
Now things are working fine, but there are still some final touches before all is done. First of all your should probably login to /wp-admin on your newly deployed site and change the password of your admin user. I use extremely simple passwords on my localhost while developing, but I do not want to use simple passwords when things are live. So if you work the same way as me go and change the password to something harder to crack than “guest”…
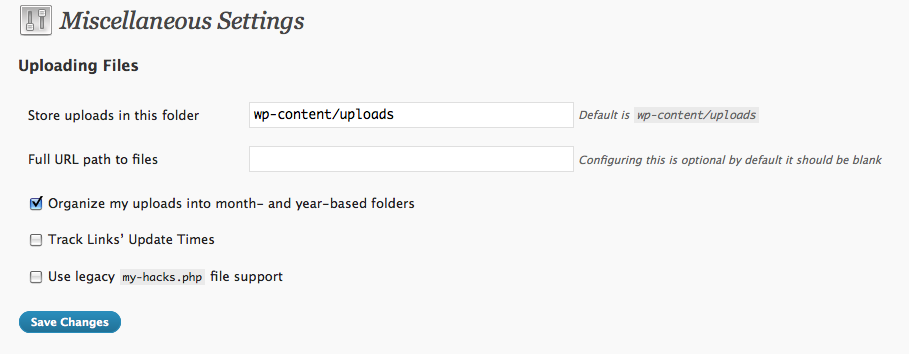
Last thing to check is that your media files are uploaded to an existing directory. Login to the WordPress controll panel and go to Settings->Miscellaneous. It is very likely that the “Store uploads in this folder” is set incorrectly, since it was set when you installed WordPress on your localhost. Change it to the default “wp-content/uploads”, otherwise you will not be able to upload media files successfully.

That’s it. This is a technique that has worked fine for me many times, but I am sure smarter people than me has better solutions to this. If you are one of those smarter people please share them with us all in the comments of this post…
Have you tried changing your operative system hosts file so that you can work locally with your domain? Such that http://www.f1almanac.com points to localhost, overriding the DNS.
Then you can just move everything to your wweb host and not have to change any configuration file, except for reverting the hosts file.
Nope, havent tried that yet, but is sounds like a good idea so I will try it out on my next WP project. Thanks.
Thanks for the helpful tutorial. I never thought to go inside the database and change the links from inside there.
Now I solved my recent problem.
@Lucian Glad I could help!
Great tutorial, many thanks! It worked exactly as you described.
Just one additional note for those who enabled pretty permalinks: you should also make sure you have .htaccess file in the document root. I had the URL rewrite rules in my local httpd.conf file, so after I transferred the site all the links to my posts weren’t working. Put the rewrite rules in its own .htaccess file and that will solve the problem.
The exact content can be copy-pasted from your WordPress Admin panel: Settings -> Permalinks.
Easy! Thanks a lot!
Great post, it was very helpful for me. If you give me your permission, I’d like to translate it into Spanish and add it to my future blog, which will include a little tutorial about how-to easily configure a localhost installation of WordPress.
Cheers from Valencia.
Very nice tutorial.
Thank you for your time.
Regards from Belgrade.
I would add a little hint: search and replace for any reference to localhost, but also do the same with any reference to your local files.
For instance, you may find in your sql database that your uploads folder is refered as something like “C:\xampp\htdocs\wordpress\wp-content/uploads” which might cause -or, at least, it caused sometimes to me- to be unable to login in the admin panel (depending on the plug-ins you are using).
So look for that string and delete the local reference part and let the /wp-content/uploads.
Cheers from Valencia.
Thank you so much for your share Andreas!!! This is very helpful!
I have been using this method successfully on several sites. Thanks for this helpful article.
Paul
It worked for me, thanks!
Haven’t even started yet as I like to find out everything first. Will be my first wordpress CMS site but your instructions are by far the easiest to follow. Taken the head ache away from one thing any way. Keep up the good work
Thank you, Andreas.
I used this to upload my blog.
I initially received a HTTP 500 Internal Server Error.
To fix this I reverted my .htaccess in the public_html directory to the settings of my previous WP installation.
This is the .htaccess file content:
# BEGIN WordPress
RewriteEngine On
RewriteBase /
RewriteCond %{REQUEST_FILENAME} !-f
RewriteCond %{REQUEST_FILENAME} !-d
RewriteRule . /index.php [L]
# END WordPress
The content that was uploaded from my localhost did not allow the hosted site to work.
Far over my head to explain why but I hope this helps someone else.
-Adam
Hi Andreas,
Thanks for this step by step guide, I followed everything but my site is not loading the work made on localhost.
Any clue?
Thanks a lot. it is working because of ur instructions. Great!
Hi,
I installed wordpress on my laptop having Windows 7 using Bitnami one click installation.Everything was very until I had the problem of deploying my wordpress blog over the internet.Please help me out…
Very good tutorial for deploying the local wordpress website to live server. I am not much in wordpress but today i needed this tutorial for one urgent project from my USA client.
I am much into joomla CMS and have gained expertise in Joomla. Both CMS WP and Joomla are great open source projects.
I am going to write similar tutorial for Joomla 🙂
Regards
Richard Philips
HTMLtoJoomla.com
We followed your suggestions, and our client’s uploaded website works perfectly.
We have a suggestion though:
1. Create your new domain on your Host Server first.
2. Create the database using your domain control panel and phpmyadmin – We use CPanel. Or get your Hosting Service Provider to do the setup for you.
3. Note the database name and settings generated for the new domain.
4. Then use the exact same settings to create the database on your localhost, and in your wp-config.php file of your new WordPress project.
5. When you upload the completed site: You wont have to edit the wp-config.php again.
6. You still need to edit the *.sql file, as you describe.
Thanks for a great tutorial – Never thought to check if the database requires editing.
Boink wrote
Have you tried changing your operative system hosts file so that you can work locally with your domain? Such that http://www.f1almanac.com points to localhost, overriding the DNS.
For me this would defeat the purpose of local development. I don’t want a live URL pointing to unfinished work.
thank you, changing the src references on the sql file is a great touch.
saved me loads of headaches!
keep up the good work!
This is good, I mean the main words are :
replace “olddomainname.com” by “new-domain.com” in database. You can do it in database or here in notepad. The effect is same. But if the MySQL database is very large e.g 60 MB or 100 MB, then this may fail. I mean edit replace.
Then better to import the old database in new database and then replace “old-domain-name.com” by “new-domain.com” in everywhere of database.
Anybody seeking wordpress domain transfer feel free to email me “webseos@gmail.com”
Thank you very much Andreas Krohn!
That is what I’m looking for on the internet.
You made it very simple and helpful.
Take care dude!
Great tutorial, thanks!!
Really great article. i was fedup creating two two sites , localhost + online. Now i can make just one and easily upload it on web server. Thanks