MySQL and SSH Tunneling for an improved quality of life

Standard

Lately I have had several projects where I need to get to a MySQL database behind a firewall on another server. In some cases I could access the database via phpMyAdmins web interface, which is useful but hardly a great user experience, in other cases it was command line access to the database only. Instead I want to use my standard MySQL GUI which means that I need to set up a SSH tunnel to the remote host. After reading way to much about SSH tunneling and trying way to many suggested commands that turned out not to work for whatever reason I finally got it right, and it has improved my quality of life immensely (OK, that might be to exaggerate just a little bit). Maybe everybody else already have figured this out, but by blogging about it at least I know that I can find my own instructions again when needed…

I run OSX 10.5 and use Sequel Pro as my MySQL GUI, but if you use something else the approach should be similar. I assume that you do have SSH access to the remote server and also access rights to the database.

  • Open a terminal window and run the command “ssh -NC <username>@<remote server> -L 3307:127.0.0.1:3306”
    • <username> is your username on the remote server
    • <remote server> is the IP address or URI to the remote server you want to connect to
  • You will be asked for the password for, write it in an leave the terminal window open. You now have a SSH tunnel to the remote server that is using port 3306 on the remote server and mapping it to your local port 3307.
  • Open Sequel Pro and connect to your remote servers database using host “127.0.0.1” and port “3307” and the username/password used on the remote database.
  • Time to do whatever you want to do in the database from within Sequel Pro (much much nicer than phpMyAdmin)

Don’t you feel a bit happier already?

Pimp my Coda

Standard

Coda is the best IDE I have ever used, and one (if not the biggest one) reason I am really happy with moving to Mac (sorry folks, Coda is Mac only). It does all the stuff I need, such as syntax highligthing, FTP, source control etc. At the same time it is skipping all the stuff that just clutters up the interface (like all the stuff Eclipse is full of). Some people might want more bells and whistles, but I am happy with a development tool that does just what it should and not more. I am mostly using Coda for writing things in the PHP Framework CodeIgniter or in the Python Framwork Django, but Coda can handle most languages quite nicely.

Coda

Even of Coda is great, it is not so great that it can not be made greater (so much for simplicity, hehe), which is pretty simple since Coda allows for plugins. In the Coda Developer Zone there are a number of plugins listed, and if you look around on the web you can find even more. Also, you can easily add new code completion, reference books and other goodies. This is a list of the stuff the extra stuff I have used and am very happy with so far…

URL Encode
This is a a very simple but very practical plugin that allows you to highlight some text in your HTML files and then URL Encode it. As a Swede using a lot of words with åäö it is very usefull.

PHP Toolkit
This plugin makes it easy to validate and clean up PHP files.

PHP Toolkit

CodeIgniter Syntax Mode
Code completion with CodeIgniter classes and functions, a must if you are using Coda to develop CodeIgniter applications. You can download the file here and read more about it in this thread in the CodeIgniter forums. I have made this syntax mode my default one for PHP files since I hardly do any PHP that is not CodeIgniter anymore.

Extra books
It is easy to include help files about programming languages etc in Coda in the form of “books”. Out of the box Coda comes with books about PHP, HTML, CSS and Javascript, but it is easy to add more. Here is a great list of more books you can include in Coda, complete with icons and all. Personally I have added CodeIgniter and jQuery so far, but I am sure some Django, Drupal and WordPress will sneak in as time goes by.

What are your favourite add ons to Coda? Please let me know if I have missed something I just must have!

F1Almanac.com – The Worlds Greatest F1 racing site?

Standard

A couple of weeks ago we launched the F1 site I have mentioned before – F1Almanac.com. The goal with the site is to create the worlds greatest Formula 1 racing site, with an incredible depth and breadth of statistics for the hardcore racing fans. We already have a huge amount of data about every race since 1950 – that includes data about every race, every car, every driver and every track – and we keep collecting more data. Every F1 race is viewed by 600 milion TV viewers world wide (Brazil and China each has 150 milion viewers per race), so it is one of the worlds most popular sports. With the unique collection of data we have we have great hopes that F1Almanac.com will attract a lot of interest.

For now it is just a temporary site to start getting the name out while we are working hard on the upcoming feature rich real site, hopefully within a few months. If you want to us to tell you as soon as we have the real F1Almanac.com up and running then please sign up to our newsletter. At the moment we are mocking up screens like crazy, and soon it is time to write some code.

If you have any ideas how to make F1Almanac.com as great as possible please let me know!

Trying my luck at the domain market…

Standard

When one is constantly working with new web projects, as I am, it is hard not to start hoarding domain names. It is a bit of a dirty habit that it is easy to get started with and hard to let go. A couple of weeks ago me and a friend was talking about wedding domain names for an upcoming project of ours, and for some reason we just started to check if domains about Swedish royal weddings were taken. The Swedish Crown Princess Victoria has been seeing a guy for quite a few years, so a wedding should be coming up at some time soon we figured. Lo and behold some domain names were free, so we registered them on a whim. Today the Crown Princess engagement and upcoming (summer 2010) wedding was announced!

So now it is time for me to try out the domain market, not just the buying side but also the selling side. Not sure how to evaluate domain names, but I am taking a rough stab hoping that I am not too greedy and not too naive. Hoping that at least we can get some nice money to spend on Google Ads for our wedding project.

These are the domains I have, all for sale at MissDomain.com in 2 portfolios (Victoriasbrollop and Kungligtbrollop):

Let’s see what the domain fairy can bring me…

Deploying a WordPress site from localhost

Standard

When I started to use WordPress one of the main problems I had was how to move a WordPress site from my local computer to my web host. There are some posts out there on how to deploy a WordPress blog, but quite a few of them are a bit too complicated. As with most things this problem is easily solved once you know what you are doing. It hit me the other day when I did just this for f1almanac.com that since I have now done this dozens of times I think it is time to share it with whoever has the same problem. Hopefully I can save somebody some time and frustration. So here is a step by step guide on how to deploy WordPress from localhost to your production web host.

Basic setup
I assume you have WordPress installed on your local computer, including a MySQL database and all. There is a really good guide on how to do this on WordPress.org. Once installed I also assume you have played around with your theme and settings and gotten the WordPress site to look and work just the way you want it.

My second assumption is that you have an account at a web host that supports PHP and allows you to setup a MySQL database. If you don’t then you can easily find many good cheap options via my web hosting price comparison site WebHostNinja.com. Many web hosts have one-click installs of WordPress, but this is nothing you need right now.

My third assumption is that you have a domain or subdomain where you want to have your fantastic WordPress site installed on. In this post I use the target domain name f1almanac.com, since that is the latest WordPress site I have deployed. Of course you need to replace “f1almanac.com” with your own domain name in all examples below.

Move the files
The first thing to do is to copy all your WordPress files from your local computer to your webhost. In my case this is all the files under /projects/f1_wp/ that I move to the directory on my host that corresponds to the domain I have choosen. For now just move all the files, no need to change anything in any file.

Move the database
Next thing is to move the database structure and all it’s content from your localhost to your web host. First of just do a MySQL dump of the structure and content of your WordPress schema. This can be done in most MySQL GUI applications. Personally I use Sequal Pro and there the MySQL dump option is hiding under File->Export. Refer to the help files of your MySQL GUI app (or MySQL command line if you are hardcore) how to do a dump. The dump should result in a .sql file containing SQL statements to create all tables needed as well as inserting all the data needed into those tables.
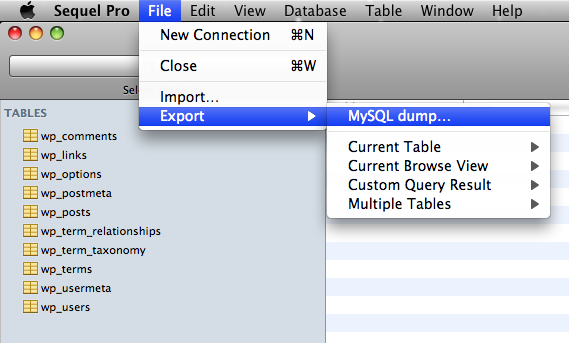
MySQL dump

Now we need to change some stuff in that .sql file. Open the file in a text editor and replace all local URLs to the URL of your new site. For me this means changing “http://localhost/f1_wp” to “http://www.f1almanac.com”. Without doing this your production WordPress installation would refer back to your localhost, and stuff would just not work. As always with search and replace, take it easy so that you dont break anything.

Replace localhost

Create a new MySQL database on your web host, and open phpMyAdmin (or MySQL client of choice) for that database. In the “Import” tab of phpMyAdmin you can import an SQL file, so choose your newly edited .sql file and click “go” to import it. This creates all the tables needed and fills it with all the content you need, this includes pages, posts, plugin settings etc.
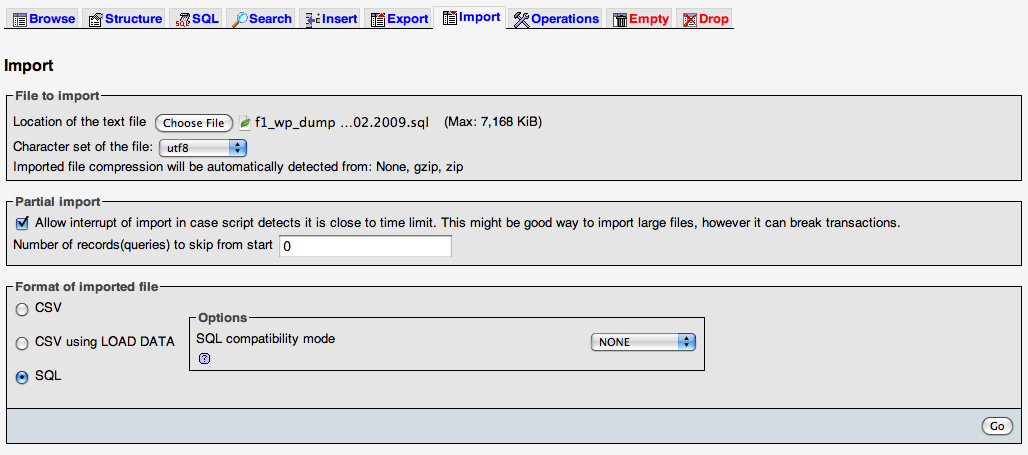
phpMyAdmin

Change database configurations
At the moment the WordPress installation on your web host do not connect to the newly created and populated database, to do that just open wp-config.php on the host in a text editor (this is one of the files you uploaded to the host ealier). In the top of the file you find all the DB settings, so change DB_NAME, DB_USER etc to correspond to your new MySQL database and not your local database.

Once that is done you should have a fully working WordPress installation on f1almanac.com, or at least on your own domain 🙂

Final touches
Now things are working fine, but there are still some final touches before all is done. First of all your should probably login to /wp-admin on your newly deployed site and change the password of your admin user. I use extremely simple passwords on my localhost while developing, but I do not want to use simple passwords when things are live. So if you work the same way as me go and change the password to something harder to crack than “guest”…

Last thing to check is that your media files are uploaded to an existing directory. Login to the WordPress controll panel and go to Settings->Miscellaneous. It is very likely that the “Store uploads in this folder” is set incorrectly, since it was set when you installed WordPress on your localhost. Change it to the default “wp-content/uploads”, otherwise you will not be able to upload media files successfully.
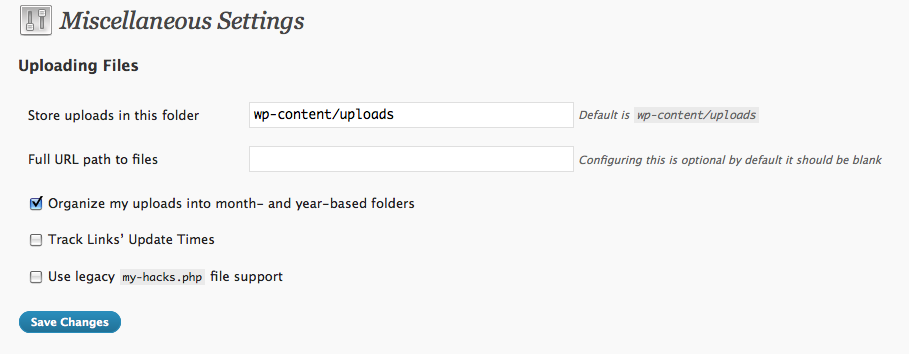
upload settings

That’s it. This is a technique that has worked fine for me many times, but I am sure smarter people than me has better solutions to this. If you are one of those smarter people please share them with us all in the comments of this post…